Okta Configuration
-
(Optional) Add Authorization Servers and Scopes in Okta.
To enable single sign-on with Okta for the OneStream Desktop application, which includes the Windows Client application and the Excel Add-In, using OIDC protocol, see the Installation and Configuration Guide.
Configure the REST API Application Registration in Okta
To configure the REST API application registration, you need to copy the client ID from Okta and paste it into the Web Server Configuration in OneStream.
-
Log in to your Okta account.
-
In the Applications list on the left, select Applications.
-
Click Create App Integration.
-
In the Create a new app integration dialog box, for Sign-in method, select API Services.
-
Click the Next button.
-
On the New API Services App Integration page, in the App integration name field, enter the name of the Okta API application.
-
Click the Save button.
-
Copy the client ID. You will need to paste this into the Web Server Configuration in OneStream.
Add Authorization Servers and Scopes in Okta
To configure authorization servers, copy the authorization server ID from the issuer URI and the custom scopes from Okta and paste them into the Web Server Configuration in OneStream.
-
Log in to your Okta account.
-
In the Security list on the left, select API.
-
Click the Add Authorization Server button.
-
Enter a name and, in the Audience field, enter the client ID from the Okta application. See Configure the REST API Application Registration in Okta step 8.
-
Click the Save button. The API page displays the list of authorization servers and the corresponding issuer URIs. You will need to paste the authorization server ID from the issuer URI into the Web Server Configuration in OneStream.
-
To add a custom scope to support the Machine-to-Machine scenario, on the API page, select the authorization server.
-
Select the Scopes tab.
-
Click the Add Scope button.
-
Enter the information and click the Create button. You will need to paste these custom scopes into the Web Server Configuration in OneStream.
Set Up the Web Server Configuration in OneStream
-
Open the OneStream Server Configuration Utility application.
-
Go to File > New Web Server Configuration File .
NOTE: Alternatively, you can open an existing file to edit it.
-
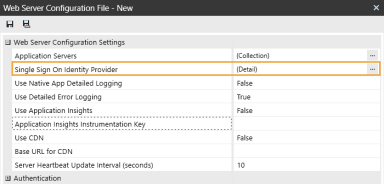
In the Web Server Configuration Settings section, click the ellipsis to the right of Single Sign On Identity Provider.

-
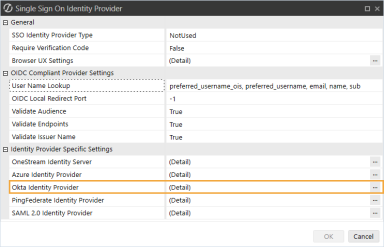
Click the ellipsis to the right of Okta Identity Provider.

-
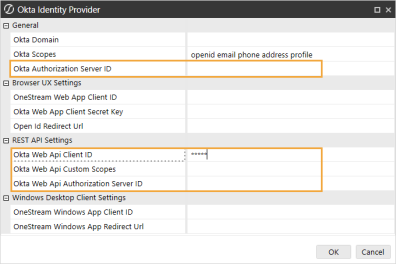
In the Okta Identity Provider dialog box, in the General and REST API Settings sections, complete the following fields:
-
Okta Authorization Server ID: Enter the authorization server ID from the issuer URI in Okta. See Add Authorization Servers and Scopes in Okta step 5. Alternatively, use the default value by either typing default or leaving as default (blank).
TIP: To view the list of authorization servers and the corresponding issuer URIs in Okta, in the Security list on the left, select API.
-
Okta Web Api Client ID: Enter the client ID from the Okta application. See Configure the REST API Application Registration in Okta step 8.
-
Okta Web Api Custom Scopes: Enter custom scopes, or leave as default (blank). See Add Authorization Servers and Scopes in Okta step 9.
-
Okta Web Api Authorization Server ID: Enter the server ID if using a custom authentication server, or leave as default (blank).

-
-
Click the OK button.
-
Save changes and reset IIS.
NOTE: Reset IIS after you save any changes to the Application Server Configuration or Web Server Configuration.
Configure the User in OneStream
-
In the OneStream Desktop application, go to System > Security > Users > <user>.
-
In the Authentication properties, complete the following fields for REST API authentication through Okta.
-
External Authentication Provider: In the drop-down menu, select the Okta configuration.
-
External Provider User Name: Enter the client ID from Okta. See Configure the REST API Application Registration in Okta step 8.
-
-
Click the Save icon.


